Understanding the Path Mode of Inkscape

This blog is an inkscape note, I will talk about my inkscape experience to laser cutting last week. which will cover the understanding of “object to path” and “stroke to path”. And an answer to the fantastic long-run trouble about the missing lxml when using extensions.

1. Understanding “Object To Path”

1.1 Probelm 1:

After Marcel told me about boxes.py to generate the initial box files and apply modification on it. It seemed easy. We brought it to the laser cutter. It doesn’t work. orz. Paul helped to change the parameters for a great while. It still doesn’t work. orz

1.2 Quick Answer:

Applying “Object to Path”

1.3 Detailed Answer:

When I was standing there, I already knew that I messed up the ideas of an Object and a Path in inkscape. The requirement of “being understanding” is not only thinking from another human, such a beginning level, isn’t it. It seems like thinking from the perspective of a program is what all the mammals need to reach. lol

placeholder

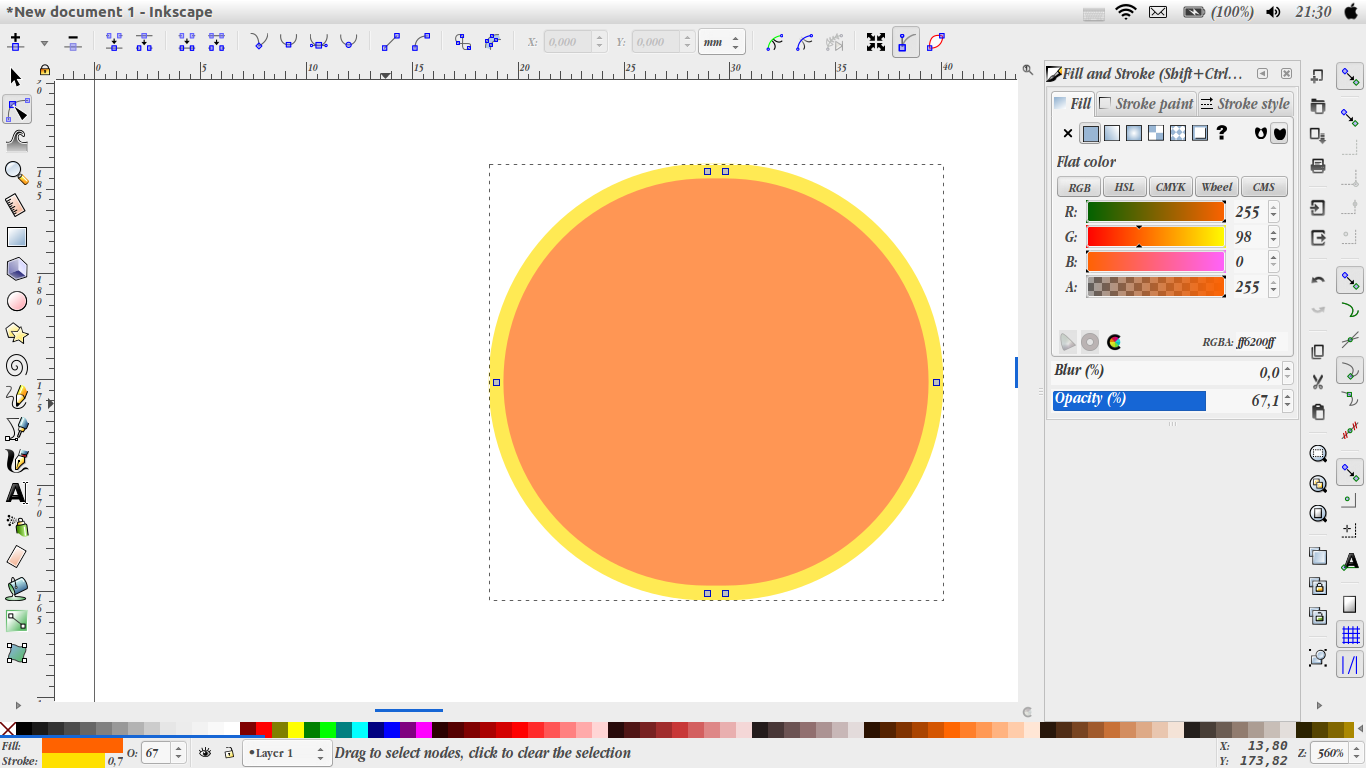
Now, this is what inkscape looks at an object, it is a rectangle (with a very round corner though). two nodes (right up corner, left down corner) and one sliding bar (rad of the corner) define the object, I can change them to make a different shape rectangle, but i can’t go beyond a doomed rectangle. This is an Object.

save it as .svg file. this is what I get in the file:

<rect
 style=”opacity:0.67099998;fill:#ff6200;fill-opacity:1;fill-rule:nonzero;stroke:#ffe000;stroke-width:0.69999999;stroke-miterlimit:10;stroke-dasharray:none;stroke-opacity:1"
 id=”rect5971"
 width=”20.788691"
 height=”19.938244"
 x=”18.993303"
 y=”112.16964"
 ry=”9.9691219" 
/>

No wonder that I failed, I gave this to a laser cutter and expected it to go along the vector which was not there. I didn’t stand a chance.

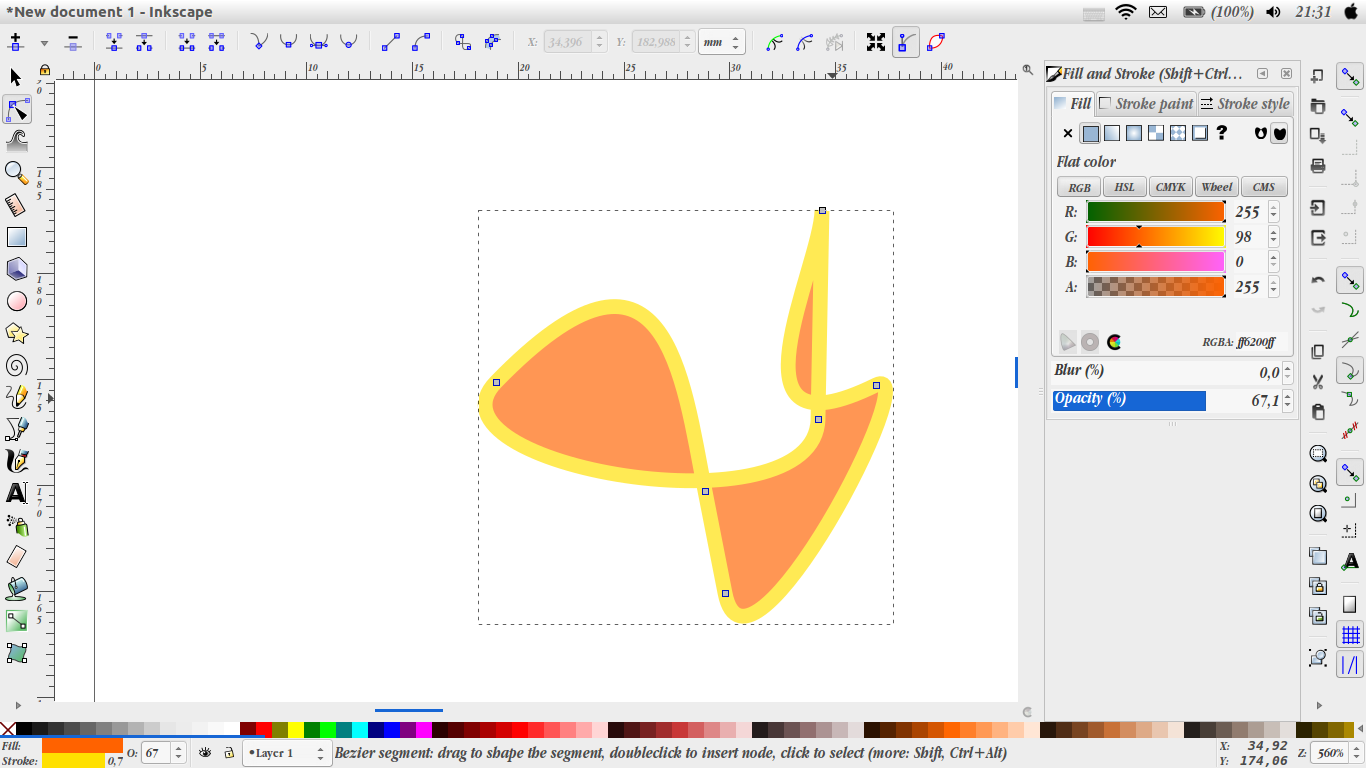
Now applying “Object to Path”

placeholder

more nodes appear, suddenly we can change it into any shape we want. Not necessary to be a rectangle. The way inkscape looks at it changed.

placeholder

save the path as .svg file. this is what I get, a path indicates the laser cutter to go along:
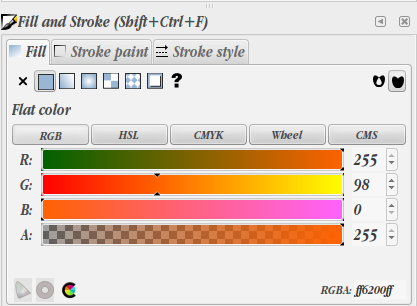
<path
 style=”opacity:0.67099998;fill:#ff6200;fill-opacity:1;fill-rule:nonzero;stroke:#ffe000;stroke-width:0.69999999;stroke-miterlimit:10;stroke-dasharray:none;stroke-opacity:1"
 d=”m 28.962425,112.16964 h 0.850447 c 5.522893,0 9.969122,4.44623 9.969122,9.96912 0,5.5229 -4.446229,9.96912 -9.969122,9.96912 h -0.850447 c -5.522893,0 -9.969122,-4.44622 -9.969122,-9.96912 0,-5.52289 4.446229,-9.96912 9.969122,-9.96912 z”
 id=”rect5971" 
/>

while I thought there would be no more trouble, I got another failure.

2. Understanding “Stroke To Path”

2.1 Problem 2:

Finally the laser cutter started to work, but it cut multiple times at the same path.

2.2 Quick Answer:

Being careful with “Stroke to Path”

2.3 Detailed Answer:

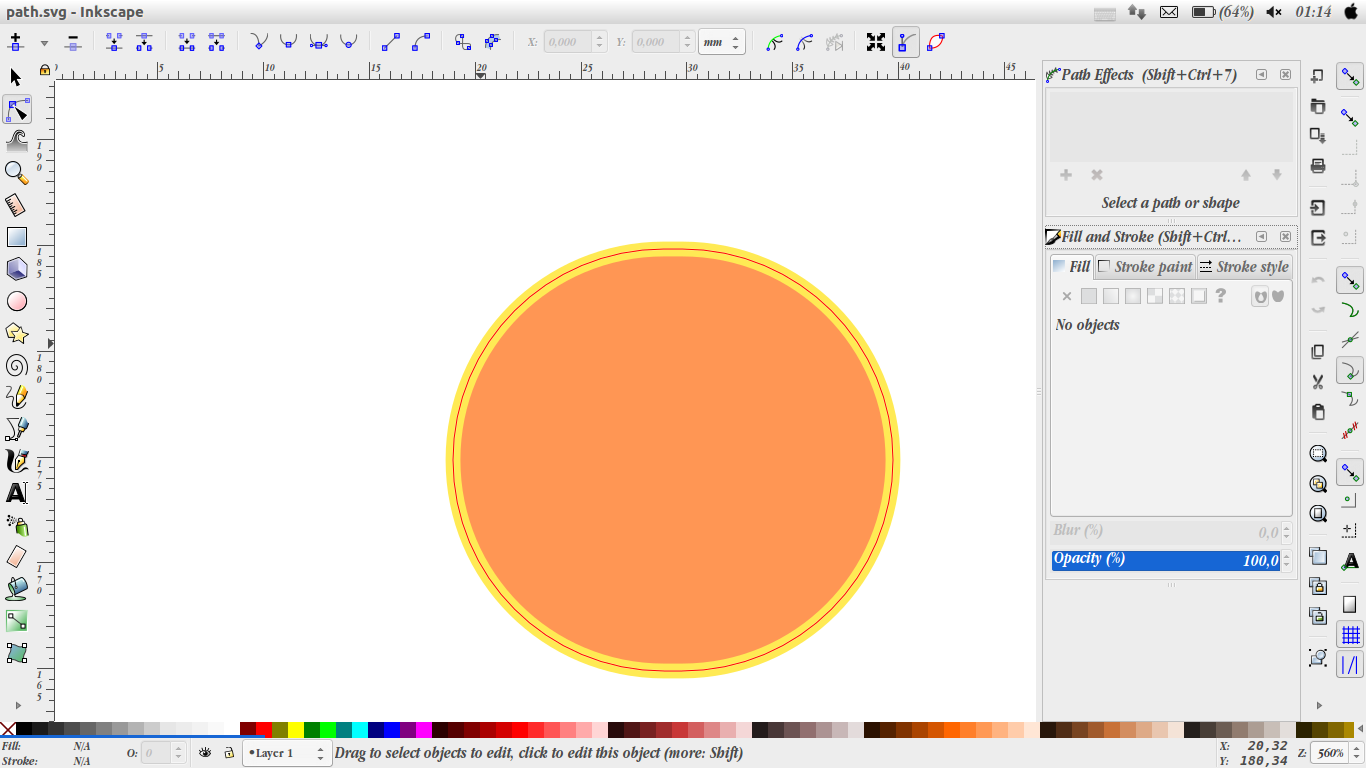
When I saw the way the laser cutter moved, it made me think that duplicated paths share the same places so it went over and over again. I made great great effort to try to get rid of the redundant lines, combined nodes. All didn’t work. I started to think maybe they were not overlapped. they were different paths just very close. I made a great close-up. That was really the reason. It came from when a stroke was set with a thickness, and after I applying “stroke to path”, paths along the edges of the original stroke were created.

before “Stroke to Path”, our path is like a single closed line (see the red thin line)

placeholder

after “Stroke to Path”, our path became the edges of the original stroke, they are two closed lines.

placeholder

That is why the laser cutter went through the same (but actually not exactly) path multiple times.

3. Extensions TroubleShooting:

3.1 Problem 3:

When I tried to use Customized Extensions. I kept get missing lxml module error.

3.2 Quick Answer:

Check your python path

3.3 Detailed Answer:

This is such a pain. Because import lxml works just fine. I had no clue why it came along.

All I found is saying that it was a long-term bug.

I took it for granted for days as an inkscape bug. I can do nothing about it. Stop being understanding. Until the day I became A Dude Who Thinks from The Prespective of Inkscape. Yeappy, pay attention when you have the same problem, especially when you are using virtual environment.

when I work on tensorflow, I realize that I am running the python of anaconda. All the library I installed goes to anaconda’s python. What if inkscape is told to use the default native python, of course it will complain, there is no lxml library there. I have to tell inkscape to use that anaconda’s python.

goto your ${HOME}/.config/inkscape/preferences.xml

find the group tag with

id=”extensions”

add one line:

python-interpreter=”${HOME}/miniconda2/bin/python”

the problem is suddenly fixed.

4. Other small Notes

when using inkscape for lasercutting:

  • in inkscape, set width of stroke as “0.1mm”, in corelDraw, set as “Hairline” two way to engrave, 1) set different colors, one for cutting, one for engrave, and setting cut way as “combine”, because engraving goes like bitmap. 2) make two runs, set less power for engrave part, then it will not able to go through.
  • material and parameters: https://hci.rwth-aachen.de/lasercutter
  • lasercutter can cut paper
  • inkscape extensions having .py and .inx to say where to put it in the menu. They all goes to ${HOME}/.congif/inkscape/extensions, and restart the program. customized font folder in my machine /usr/share/fonts
  • making a physical dot on the material along the laser calibration red pot. just in case when the job has to be interrupted. we still have a chance to continue. when the material is not standard size, set the canvas in program as real size to save material. And if still not confident, making power as 0 to see if every thing is in the area or use VisiCut to preview.
  • in inkscape, the display unit “mm” is set at File -> Document Properties, select in object mode can change object size.
  • one node can only connect to two other nodes. so don’t try to make three connects to a node.
  • perfect fitting distance doesn’t make a tight-enough assembly, we used glue. tightness needs offset (e.g. 0.1mm).
  • when load .svg to blender as preview, path-combine the nodes. and making fill. Inter-section Filling option is not obvious, it is two icons on the right up corner of Fill setting.

placeholder

[END]

Ai-笔记:开发pop-punk.rocks

为了准备即将去参加的Galaxy Camp,第一个pop punk音乐节,我开发了一个简单的歌词网站 www.pop-punk.rocks ,这是开发过程中遇到和解决的困难。

0. 一个主机,多个域名

刚开始的解决方案很天真,在index.php里写了一个switch,让不同的域名跳转到不同的文件夹。

index.php

<?php
switch ($_SERVER["HTTP_HOST"])
{
case "www.pop-punk.rocks":
case "pop-punk.rocks":
header("location:poppunkrocks/");
break;
case "www.wolfiethedog.de":
case "wolfiethedog.de":
header("location:wolfiethedog/");
break;
case "www.notagenius.cn":
header("location:notagenius/");
break;
}
?>

不过,登录就发现问题了,因为跳转文件夹,就变成二级域名了。跳转过后变成www.pop-punk.rocks/poppunkrocks/,这不是我想要的,得知Apache下可以用virtual hosts在路径/etc/httpd/conf下修改httpd.conf

Listen 80

<VirtualHost *:80>
    DocumentRoot "/var/www/html/poppunkrocks/"
    ServerName www.pop-punk.rocks

    # Other directives here
</VirtualHost>

<VirtualHost *:80>
    DocumentRoot "/var/www/html/wolfiethedog/"
    ServerName wolfiethedog.de

    # Other directives here
</VirtualHost>

最后重启service httpd restart

问题解决了。

所以,一个主机想用安排多个域名,用虚拟主机。

1. Reveal.js嵌入视效

说现在的艺术性前端,一言以概之,Usefulness不足,Pointlessness不少,可是观赏性就是爆表。问我喜不喜欢,我会说非常非常喜欢,因为就是创造力在canvas上的展现,还带这么点Coding的艺术,而且我相信它的功能性会丰富起来的。 我想要做一个艺术友好的页面。p5.js, three.js, d3.js都可以。哪个方便用哪个。 用d3.js是因为已经有现成的reveal.js的干净的plugin,three.js找到一个demo,但是代码不清晰。

嘻嘻,在页面上画我自己想要的“生成艺术”,还是擅长的。

placeholder placeholder

d3_js.html

<body>
<script src="//d3js.org/d3.v3.min.js"></script>
<script>

var width = Math.max(innerWidth),
    height = Math.max(innerHeight);

var x1 = width,
    y1 = -height/3,
    x0 = 0,
    y0 = height + height/3,
    i = 0,
    r = Math.max(400,Math.max(width,height)+height/3),
    τ = 2 * Math.PI;

var canvas = d3.select("body").append("canvas")
    .attr("width", width)
    .attr("height", height)
    .on("ontouchstart" in document ? "touchmove" : "mousemove", move);

var context = canvas.node().getContext("2d");
context.globalCompositeOperation = "lighter";
context.lineWidth = 0.7;

d3.timer(function() {
  context.clearRect(0, 0, width, height);

  var z = d3.hsl(++i % 180-180, 1, 0.5).rgb(),
      c = "rgba(" + z.r + "," + z.g + "," + z.b + ",",
      x = x0 += (x1 - x0) * .1,
      y = y0 += (y1 - y0) * .1;

  d3.select({}).transition()
      .duration(30000)
      .ease(Math.sqrt)
      .tween("circle", function() {
        return function(t) {
          context.strokeStyle = c + (1 - t) + ")";
          context.beginPath();
          context.arc(x, y, r*t, 0, τ);
          context.stroke();
        };
      });
});
function move() {
}

</script>

</body>

主页最终效果: placeholder

2. Vue.js遍历Json

因为这次歌词本比以往多很多,一共有8个乐队,将近90首歌,手动写html是最糟糕的主意,设计json条目,发现我需要band.title, song.title, youtube.link, song.lyrics 因为json还是要手写,本来以为genius api可以给我返回歌词,但是后来发现并没有,歌词是有版权保护的。所以,我给每个乐队安排了一个json。手动写json。 vue-for在html里直接可以用,非常好用。 所以保持了页面body很清晰。因为body主体就是一个json文件的2次遍历。

index.html

<section data-transition="convex" data-background="#2B2B2B" id="statechamps">
	<section class="scrollable">
	<h2>State Champs</h2>
		<template v-for="(item,index) in items">
		<a v-bind:href="'#/1/'+ ++index">
		<h3 style="color:orange"></h3>
		</a>
		</template>
	</section>
		<template v-for="item in item1s">
		<section class="scrollable" data-scrolling>
			<iframe :data-src="item.Youtube"></iframe>
			<h2 style="color:orange"></h2>
			<p v-html="item.lyrics"></p>
		</section>
		</template>
</section>

vue加载本地json出了点问题,简单的import怎么都失败,最后的解决方法是模拟成网络请求,我还是被这些异步加载块给弄糊涂了。

index.html

<script>
	(async () => {
	const statechampsResponse = await fetch('./json/statechamps.json');
	const statechamps_json = await statechampsResponse.json();
	new Vue({
		el: '#statechamps',
		data() {
		return {
				items: statechamps_json
				}
				}
		})
	})();
</script>

3. Reveal.js变竖屏和滚动条和Menu

因为在做不是reveal.js设计出来要做的事情,所以需要改! 首先,歌词一定超过屏幕高度,我需要滚动条, customized.css

.scrollable {
overflow-y: auto !important;
overflow-x: hidden !important;
height: 1248px !important;
}

另外变竖排和为了在用户触摸屏幕的时候触发滚动条而不是走向不同的页面,我还需要禁用touch index.html

Reveal.configure({ touch: false });
Reveal.configure({ width: 910, height: 1248 });

910, 1248是这个主流手机屏幕比例下的,因为导航键的存在,不可以全屏。在iphone X这种长条的高宽比例下,空间还是被蛮多浪费的。

Menu是现成的Plugin,因为很多hardcoded的地方,所以就进源码改了,用阿狗icon的想法也没有落实,最后页面内icon还是fontawesome里的。

最后menu的效果: placeholder

4. 设计

color block式幼稚的设计

placeholder placeholder placeholder placeholder

最后的效果:

placeholder placeholder placeholder placeholder

5. 问题和结语

没有解决的问题是在firefox下转页时的背景颜色会丢失,firefox在2页之后,就无法改变背景颜色了,当内容是inline的时,没有问题,当内容是在加载json后,firefox就出问题。测试了firefox 59 和 60, 都失败,而safari,chrome却没有这个问题。

解决方案是,我写了一条字,“如果没有颜色,看不清歌词,请去themeless的子页面”的白痴方案。

产品体验,原来计划进一个页面,就开始播歌,在PC上这个实现了,但是在手机上,因为有流量问题,本还担心是不是要改一下设计,后来发现,即使autoplay设置成true,手机方面还是会拦截自动播放,就没有去处理它。

自我评价的话,这还是一个拼凑现成工具的网站,并没有很多原创性。 但是功能性上来说,听歌和背歌词都很方便,音乐节如果可以Having a good time,就值得了。

「完」

Ai-笔记:Blender2.79 + Add-On

前言,本文是威玲旺卡原创笔记,没有告知请不要转载,代码也请不要抹去作者条目,谢谢啦。

0. 收获

Blender1周,终于明白CG课上的那些东西和可以模型简单的物件,不用依仗别人的模型了。

额外收获,了解了一个动画角色的制作过程。

在一周前看不懂Gleb Alexandrov的教程,但是在跟了Blenderguru的教程之后,突然觉得自己入门了,是个挺有成就感的事情,非常感谢他,制作了空前绝后极完美的教程。

无论是建模还是使用软件本身,费眼睛是真的。

cycles渲染器渲染效果传神,还可以自己写着色器代码在node editor里调试。

Blender不只是一个3d软件,它灵活的插件扩展,内部终端,script editor,texture painting和video editor,还有后期堪比整个image编辑库,都让它远远超过一个3d软件的定义。

新的电影Agent 327,惊艳指数已经远远超过过去所有blender open movie了

无论怎么看,软件,用户,开发者状态,Blender都很出色,非常推荐,期待2.8的发布。

下面就是我这一周里做出来的东西了,其中甜甜圈是跟着BlenderGuru教程的收获,真的是太棒了。

placeholder

placeholder

placeholder

placeholder

1. Ubuntu下Alt键修正

Blender是靠热键才能用好的,所以也是它比其他软件难入门的一个原因。

Alt键在Ubuntu下会失效,GNOME界面都会有这个问题,这在Blender的使用上是不可以接受的问题。

问题的原因是,Alt键被Ubuntu的系统作为移动窗口的热键了,所以要更改,可以把系统热键map到super键上,

方法是在CCSM里改,(compizConfig setting Mangement, 安装sudo apt-get install compizconfig-settings-manager compiz-plugins-extra

CCSM -> Window Mangement -> Move Window -> Initial Window Move把热键从<Alt>Button1改到<Super>Button1.

就完成了。

placeholder

2.自定义Add-On

用Blender过程中有一个事情我比较难搞定,就是选中,往往用户是知道要选中什么object的,可以在菜单栏选中它,但是菜单栏只是把目标选为Active Object,真正Select永远依仗用户在场景里去瞄准点击它,当工程很小这都没差,但随着工程变大,这就要求用户越过层层object,或者很多次滚轮缩放移动再选中,这也费blender的计算量,因为它要花力气去根据用户鼠标位置计算到底是哪个object,所以用到后面,用户往往会发现,“选中”变成了一个越来越“艰难”的事情,然而这些只要有个select active object的选项就可以避免了,可惜一阵搜索之后,并没有这样的东西,大家都会把鼠标选中当成一个想当然的事情,可我不这么认为。 我通过它的API给它写了一个Add-On,并生成了一个方便使用的菜单和热键,这个Add-On的功能是,在菜单栏选择想要的object后,按下Ctrl+Shift+空格,或者选择菜单栏的Object -> Select Active,就可以自动在场景里选中这个object了,在object非常多,或者想选中相机和灯时,会相当好用。

placeholder

Add-On代码

import bpy

bl_info = {
    "name": "Select Current Active Object",
    "author": "ThatWolfieFeeling",
    "category": "Object",
}

class Active_Object_Selection(bpy.types.Operator):
    """Select Current Active Object"""
    bl_idname = "object.select_active"
    bl_label = "Select Active"
    bl_options = {'REGISTER', 'UNDO'}

    def execute(self, context):
        bpy.ops.object.select_all(action = 'DESELECT')
        bpy.context.active_object.select = True
        return {'FINISHED'}

def menu_func(self, context):
    self.layout.operator(Active_Object_Selection.bl_idname)

# store keymaps here to access after registration
addon_keymaps = []

def register():
    bpy.utils.register_class(Active_Object_Selection)
    bpy.types.VIEW3D_MT_object.append(menu_func)

    # handle the keymap
    wm = bpy.context.window_manager
    km = wm.keyconfigs.addon.keymaps.new(name='Object Mode', space_type='EMPTY')
    kmi = km.keymap_items.new(Active_Object_Selection.bl_idname, 'SPACE', 'PRESS', ctrl=True, shift=True)
    addon_keymaps.append(km)

def unregister():
    bpy.utils.unregister_class(Active_Object_Selection)
    bpy.types.VIEW3D_MT_object.remove(menu_func)

    # handle the keymap
    wm = bpy.context.window_manager
    for km in addon_keymaps:
        wm.keyconfigs.addon.keymaps.remove(km)
    # clear the list
    del addon_keymaps[:]


if __name__ == "__main__":
    register()

把脚本命名为Select_Active_Object_byThatWolfieFeeling.py放在Blender目录的脚本位置../../scripts/addons 在启动Blender后,在User Perference中选择Add-Ons,再搜索wolfie,勾上Object: Select Current Active Object就可以在每次使用Blender的时候用这个功能了。

3. 角落

  1. 如果发现顶点超过10k后,选中花费很长时间,应该是驱动不支持,可以试试看在User Preference -> System -> Selection -> 从Automatics改成OpenGL Occlusion Queries

placeholder

折腾一个Two_Sum(中)

在这篇文章里,我仍旧聚焦Two Sum, 1. 通过数据结构和优化算法来降低复杂度(C++) 2. 在其他语言里调用现成的散列表 3. 在C里用数组浆糊一个散列表

Two Sum题干和又一次失败:

Given an array of integers, return indices of the two numbers such that they add up to a specific target. You may assume that each input would have exactly one solution, and you may not use the same element twice. Example: Given nums = [2, 7, 11, 15], target = 9, Because nums[0] + nums[1] = 2 + 7 = 9, return [0, 1].

上次我的最天(bai)真(chi)解法,所有都通过了,除了Python3运行超时。没放弃,如果简单写两层for循环注定超时,那还有一个尝试项——用它的迭代器模块itertools。如果模块内部有优化的话,可能可以以语言的优秀特性来弥补思维上的不聪明

Python3.x解一之itertools:

class Solution:
    import itertools
    def twoSum(self, nums, target):
        """
        :type nums: List[int]
        :type target: int
        :rtype: List[int]
        """
        comb = itertools.combinations(nums,2)
        res = [x for x in comb if sum(y for y in x) == target]
        i = nums.index(res[0][0])
        j = nums.index(res[0][1],i+1)
        return [i,j]      

如果输入nums=[3,3]target=6,原来程序会返回[0,0],但正确的结果是[0,1],因为nums.index[3]返回0,后来发现index的第二个参数——开始搜索的下标,所以把它设成上一个结果的下标+1就可以得到第二个3期待下标了。

Performance: Time Out

还是超时了,至少知道了python里的itertools没有优化。 现在就正式从数据结构上进行优化了,这到底是个什么问题,是搜索问题啊,过去我用了“挨个搜索”的遍历。现在想想我有什么要什么,有无序数列,要搜索,找下标,散列表浮现眼前,花费空间来优化时间,可以把时间复杂度从O(n2)降低到O(n),散列表要存n个数值-下标对,空间复杂度从O(1)上升到O(n)。

C++解二——数据结构优化——2-Pass Hash Table:

class Solution {
public:
    vector<int> twoSum(vector<int>& nums, int target) {
        vector<int> result;
        map<int,int> hash_table;
	//two-pass
        for (int i=0; i<nums.size(); i++){
            hash_table[nums[i]] = i;
        }
        for (int i =0; i<nums.size()-1; i++){
            int location = hash_table.find(target-nums[i])->second;
            if(location !=i && location != hash_table.end()->second){
                result.push_back(i);
                result.push_back(location);
                return result;
            }
        }
        throw std::invalid_argument("No solution"); 
    }
};

Performance: 19ms

上面的代码思路很简单,先构建数据结构后求解。用一个for循环来构建一个散列表。然后再用一次for来搜索求解。算上常数,时间复杂度是线性时间——2n

算法问题上往往有“抖机灵”做法,透彻了解问题后然后想出解题思路,过程就是——想。

这道题里还可以“抖机灵”,我们需要完整的散列表吗?并没有,可以一边构建一边搜索,这样时间可以从2n下降到n,在设计算法时,时间复杂度往往是忽略掉常数项的,但在实战里,去掉一个for可以把运行时间减半。下面的代码就把运行时间从19ms减少到10ms。而空间上散列表的任务也从存储固定n对下降到最多n-1对。

C++解三——进一步算法优化——1-Pass Hash Table:

class Solution {
public:
    vector<int> twoSum(vector<int>& nums, int target) {
        vector<int> result;
        map<int,int> hash_table;
	//one-pass
        for (int i=0; i<nums.size(); i++){
                int location = hash_table.find(target-nums[i])->second;
                if(location != hash_table.end()->second){
                result.push_back(location-1);
                result.push_back(i);
                return result;}  
                else{
                hash_table[nums[i]] = i+1;
                }
        }
        
        throw std::invalid_argument("No solution"); 
    }
        
};

Performance: 10ms

三种算法的时间对比:

placeholder

各语言的散列表实现:

下面是其他语言的解三。调用现成的HashMap函数(Dictionary),不研究散列函数和冲撞的处理。

Java解三:

class Solution {
       	public int[] twoSum(int[] nums, int target) {
                Map<Integer, Integer> map = new HashMap<>();
                for (int i = 0; i < nums.length; i++) {
                	int x = target - nums[i];
                        if (map.containsKey(x)) {
                                return new int[] { map.get(x), i };
                        }
                map.put(nums[i], i); 
        	}
        	throw new IllegalArgumentException("No two sum solution");
	}
}

Performance:9ms

Python2.x/3.x解三:

class Solution(object):
    def twoSum(self, nums, target):
        """
        :type nums: List[int]
        :type target: int
        :rtype: List[int]
        """
        map={}
        for i in range ( 0, len(nums) ):
            x = target - nums[i]
            if x in map:
                return [map[x], i]
            else:
                map[nums[i]] = i 
        raise ValueError("No solution")

Performance: python2 40ms python3 63ms

Javascript解三:

var twoSum = function(nums, target) {
        var map = {}
        for (var i=0; i<nums.length; i++){
                x = target - nums[i];
                if (x in map){
                        return [map[x], i]; 
                }
                else{
                        map[nums[i]]=i;
                }
        }
        throw new Error("No solution");    
};

Performance: 97ms

Ruby解三:

def two_sum(nums, target)
    map = {}
    nums.each_with_index do |num, i|
        key = ((map.select { |k,v| v == (target-num)}.keys)) 
        key.empty? ? false : (return [key, i].flatten)
        map[i]=num
    end 
    return "No solution"
end

Performace: 2845ms

Go解三:

twoSum(nums []int, target int) []int {
    m := make(map[int]int)
    for i := 0; i< len(nums); i++ {
        x := target - nums[i]
        if _, ok := m[x]; ok {
                return []int{m[x],i}
        } else {
                m[nums[i]] = i 
        }
    }   
    return nil 
}

Performance: 12ms

Swift解三:

class Solution {
    func twoSum(_ nums: [Int], _ target: Int) -> [Int] {
        var map = [Int:Int]()
        var result = [Int]()
        for i in 0..<nums.count{
                let x = target - nums[i]
                if let j = map[x] {
                        result.append(j)
                        result.append(i)
                        return result   
                } else {
                        map[nums[i]]=i
                }
         }
         return result    
    }   
}

Performance: 24ms

C#解三:

public class Solution {
    public int[] TwoSum(int[] nums, int target) {
       var map = new Dictionary<int,int?>();
       for (int i=0; i<nums.Length; i++){
                int x = target - nums[i];
                if (map.ContainsKey(x)){
                        return new int[] { map[x].Value, i};    
                } else {
                        map[nums[i]] = i;
                }
        }
        throw new ArgumentNullException("No solution");    
    }   
}

Performance: 518ms

注释:需要空间名称using System.Collections.Generic;

Kotlin解三:

class Solution {
    fun twoSum(nums: IntArray, target: Int): IntArray {
        val map = HashMap<Int, Int>()
        for( i in 0..nums.size-1){
                var x = target - nums[i]
                if (map.containsKey(x)) {
                        return intArrayOf(map.get(x)!!,i)
                } else {
                        map.put(nums[i],i)
                }
        }
        return intArrayOf()    
    }   
}

Performance: 498ms

注释:Kotlin如果遇上type mismatch: inferred type is Int? but Int was expected,在确认数值非空的情况下,可以用操作符!!或者.safe()来转换成Int

C里用数组假装散列表

如果这道题我需要它最快,不计代价地最快,那我有什么选项?

最快的搜索,所以用数组的offset,从地址直接得到值。代价是冗余内存,把数组长度控制在max=target-min,len=max-min+1

C解三:

int* twoSum(int* nums, int numsSize, int target) {   
        //Array to imitate a HashMap
        int min = INT_MAX;
        for (int i = 0; i < numsSize; i++) {   
            if (nums[i] < min)  
                min = nums[i];  
        }
        int max = target - min;  
        int len = max - min + 1;
        int *table = (int*)malloc(len*sizeof(int));  
        memset(table, -1, len*sizeof(int));
    
        static int result[2] = { -1,-1 };    
        for (int i = 0; i < numsSize; i++) {
                //ignoring outliner to save space
                if (nums[i]-min < len) {
                        int x = target -nums[i] - min;
                        if (table[x] != -1) { 
                                result[0] = table[x];  
                                result[1] = i;  
                                return result;  
                        }
                        table[nums[i]-min] = i;  
                }
        }
        free(table);  
        return NULL;  
}

Performance: 4ms

注释:果然最快,这算法出处 雅可的博客 ,我改动了一下。 快是快了,击败了91.41%的提交,但是空间关联输入数据,不仅非常大,而且还有不可控的代价。

不专业分析:

placeholder

算法上,是平方时间变线性时间的升级,C的那个浆糊法是无敌了,但KotlinC#的比较还真不够显著,Kotlin想必是虚拟机的关系。

其他:

  • 发现一个学习Go的好网站 Go By Example
  • 和语言方法查询网站 OverAPI
  • 背景音乐:BjörkUtopia ,刷新了我的感官
  • 下次还是这一题,我想研究一下不同的排序算法

如果有建议,观点或者问题的话,可以给我发邮件aileen365@gmail.com

折腾一个Two_Sum(上)

在这篇文章里,我用了10个计算机语言解决一个算法小问题。再看了下Leetcode执行它们的性能。

Two Sum题干:

Given an array of integers, return indices of the two numbers such that they add up to a specific target. You may assume that each input would have exactly one solution, and you may not use the same element twice. Example: Given nums = [2, 7, 11, 15], target = 9, Because nums[0] + nums[1] = 2 + 7 = 9, return [0, 1].

两层for循环,最天真,是因为时间复杂度最高O(n2),但是不能忘它是空间复杂度最低的O(1)。但是最天真的遍历不代表它没什么好折腾的。可以换语言写写。

C++解一:

class Solution {
public:
    vector<int> twoSum(vector<int>& nums, int target) {
        vector<int> result;
        for (int i=0; i<nums.size(); ++i){
                for(int j=i+1; j<nums.size(); ++j){
                        if( nums[i]+nums[j] == target ){
                                result.push_back(i);
                                result.push_back(j);
                                return result;
                        }
                }
        }
        throw std::invalid_argument("No solution");
    }   
};

Performance: 190ms

Python2.x/3.x解一:

class Solution(object):
    def twoSum(self, nums, target):
        """
        :type nums: List[int]
        :type target: int
        :rtype: List[int]
        """
        for i in range ( 0, len(nums) ):
            for j in range( i + 1, len(nums) ):
                if nums[i]+nums[j] == target:
		    return [i, j]
        raise ValueError("No solution") 

Performance: python2 5543ms / python3 time out

Java解一:

class Solution {
    public int[] twoSum(int[] nums, int target) {
        for (int i=0; i<nums.length; i++){
            for (int j=i+1; j<nums.length; j++){
                if (nums[i]+nums[j] == target){
                    return new int[] { i,j };
                }
            }
        }
        throw new IllegalArgumentException("No solution");
    }
}

Performance: 43ms

C解一:

/**
 * Note: The returned array must be malloced, assume caller calls free().
 **/
int* twoSum(int* nums, int numsSize, int target) {
    static int result[2] = { -1,-1 };
    for(int i = 0; i < numsSize; i++)
    {
        for(int j = i+1; j < numsSize; j++)
        {
            if(nums[i]+nums[j] == target)
            {
                result[0] = i ;
                result[1] = j ;
                return result;
            }
        }
    }
    return NULL;
}

Performance: 103ms

C#解一:

public class Solution {
    public int[] TwoSum(int[] nums, int target) {
         for (int i=0; i<nums.Length; i++){
            for (int j=i+1; j<nums.Length; j++){
                if (nums[i]+nums[j] == target){
                    return new int[] { i,j };
                }
            }
        }
        throw new ArgumentNullException("No solution");
    }
}

Performance: 805ms

Javascript解一:

/**
 * @param {number[]} nums
 * @param {number} target
 * @return {number[]}
 **/
var twoSum = function(nums, target) {
    for (var i=0; i<nums.length; i++){
        for (var j=i+1; j<nums.length; j++){
            if (nums[i]+nums[j] === target){
                return [i,j];
            }
        }
    }
    throw new Error("No solution");
};

Performance: 200ms

Ruby解一:

# @param {Integer[]} nums
# @param {Integer} target
# @return {Integer[]}
def two_sum(nums, target)
  nums.each_with_index do |num1, i|
    nums[i+1..-1].each_with_index do |num2, j|
      return [i, i+j+1] if num1 + num2 == target
    end
  end
  return "No solution"
end

Performance: 5624ms

Swift解一:

class Solution {
    func twoSum(_ nums: [Int], _ target: Int) -> [Int] {
        var result = [Int]()
         for i in 0..<nums.count {
            for j in i+1..<nums.count {
                if nums[i] + nums[j] == target {
                    result.append(i)
                    result.append(j)
                    return result
                }                
            }
         }
         return result  
    }
}

Performance: 947ms

Golang解一:

func twoSum(nums []int, target int) []int {
    for i := 0; i < len(nums); i++ {
        for j := i + 1; j < len(nums); j++ {
            if nums[i] + nums[j] == target {
                return []int{i, j}
            }
        }
    }
    return nil
}

Performance: 63ms

Kotlin解一:

class Solution {
    fun twoSum(nums: IntArray, target: Int): IntArray {
        for( i in 0..nums.size-1){
            for( j in i+1..nums.size-1){
                if(nums[i] + nums[j] == target){
                    return intArrayOf(i,j)
                }
            }
        }        
        return intArrayOf()
    }
}

Performance: 593ms

Home Studio不专业分析:

蛮无聊的吧,每个代码我都尽力让他们相近了,Ruby, Swift, GolangKotlin全部都不懂异常,就被我忽悠了。 过去学语言都掉进了语法这个白痴的误区里,我现在问我自己它们之间有啥各自的语法特性和优劣,我根本就说不出来,很衰。 所以唯一的意义是温习了一遍语法,不过我把它们都送到Leetcode里去运行了,从过去有限的刷题经验上看各种语言的测试集是一样的。 整理了它们的运行时间绘制了一张图。 placeholder

关于正式的计算机语言Benchmark看 The Computer Language Benchmarks Game

图和Benchmark比较,除了JavaGo快的不正常,C++看起来有点慢,但是不知道编译器,Python真是不济,其他排序还挺理性。我想,

  • Leetcode里的JavaGo,不管它是什么,但应该不是CPU运行时间

  • Python3直接Time Out,在单独的手动测试集上Python3竟然比Python2慢将近一倍。这个真意外。

关于这篇博客一些有意思的东西:

  • 这是我fork Hyde 后修改的一个Github Page

  • 博文是我在 Vim 里搭配插件 livemark.vim 直接码的,目的是熟悉下 JerkllMarkdown

  • 图表是在 Infogram 里生成的

  • 题目和测试都是在 Leetcode 上进行的,用了 Leetcode-cli 把代码本地化

  • 期间把 阿狗 忘记,以至于它被泡在洗衣粉里一晚

  • 一直单曲重复Luca BrasiTheme Song from Hq

  • 发现Markdown定义的符号里嵌套html的tag会失败,这样的O(n<sup>2</sup>)和 O(n2)

如果有建议,观点或者问题的话,可以给我发邮件aileen365@gmail.com,因为我还不知道该怎么在静态网页里设留言板,有主意欢迎告诉我。